Convolutional Neural Network (CNN)
Convolutional Neural Network (CNN) is often used in object detection and recognition. In this assignment, we will try to optimized the CNN algorithm on GPUs. We provide two versions of source code, one in pure C++, and the other one containing empty CUDA functions, as described below. Special thanks to Maurice Peemen, the author of the CNN code, for his great effort to make this assignment possible.
- CNN in pure C: "cnn_c.zip". The codes have been tested under Linux using gcc compiler. If you want to use OpenCL for the assignment, you can start with this version. If you are using CUDA and know how to setup compilation tool-flow, you can also start with this version.
- CNN with example CUDA functions: "cnn_cuda5.5.zip". The codes have been tested on the server (Linux and CUDA 5.5). You can read below for detail instructions to compile the code.
Contents
Implementation of CNN
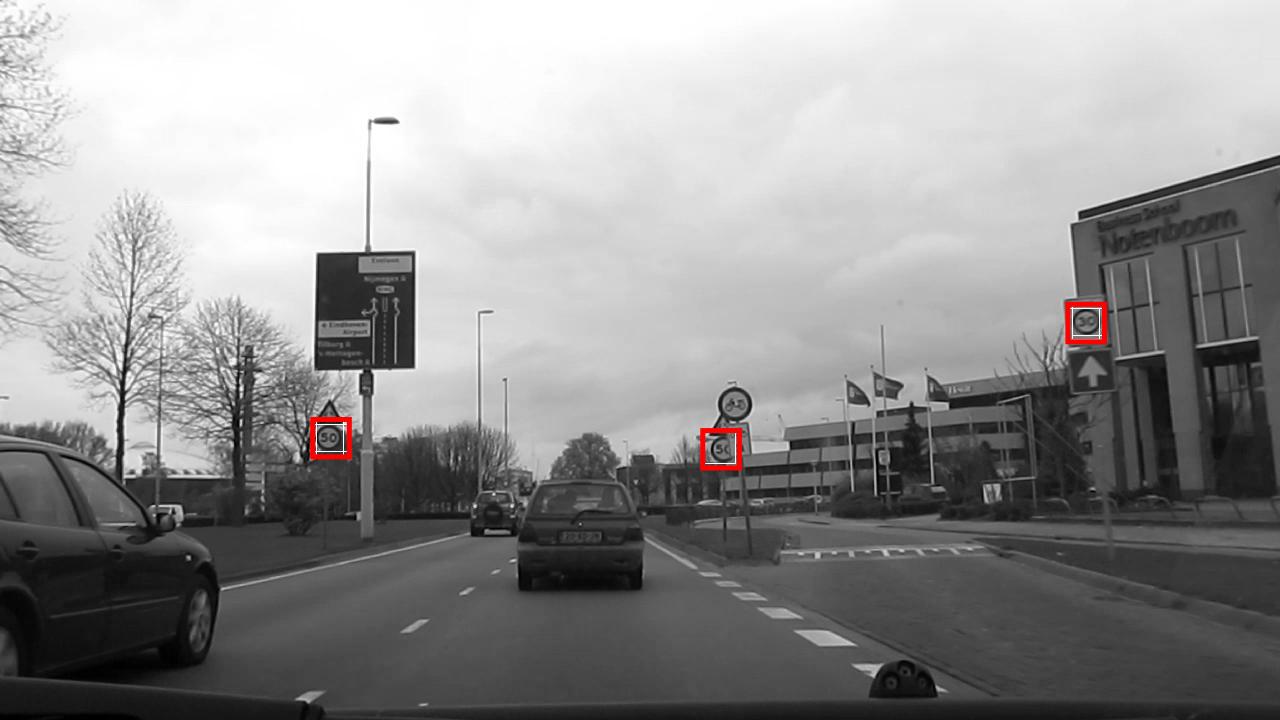
This assignment uses a CNN that is trained for speed sign detection and recognition. For example, the picture below shows the detection and recognition of three speed signs (in red box).
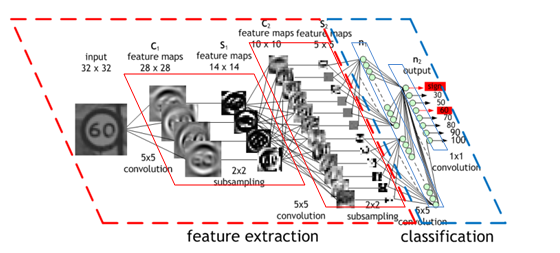
The detection is performed in multiple layers, each consists of multiple feature maps. Below is an example of the CNN with a small input image of 32x32 pixels. In the assignment, we will use a large input image of 1280x720 pixels, and an optimized CNN that merges the convolution layer and subsampling layer.
Overview of a Convolution Layer
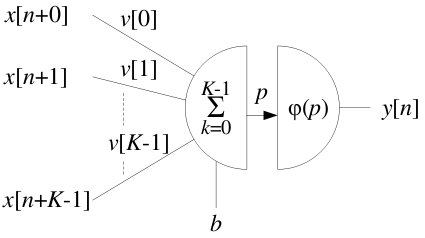
The convolution can be written with a few variables and a sigmoid function:
- The bias (b).
- The input (x) and weight (v), of size K (or K*K for 2D case).
- The sigmoid function ( φ ).
The sigmoid function is described by the equation:
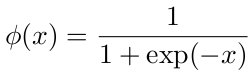
For a two dimensional case, the convolution can be described by the equation:

Example of the First Convolution Layer
The first layer has one input map (the input image) of size 1280x720 and 6 output maps, 638x358 each. The convolution window has a size of 6x6. The layer is implemented as nested loops as shown below.
for(r=0; r<6; r++){ //loop over 6 feature maps
    for(m=0; m<358; m++){ // loop over 358 rows
        for(n=0; n<638; n++){ // loop over 638 columns
            y[r*358*638+m*638+n]=bias[r]; // Step 1: load bias
            for(k=0; k<6; k++){ //loop over 6x6 window
                for(l=0; l<6; l++){ // loop over 6x6 window
                    y[r*358*638+m*638+n] += in_layer[(m*2+k)*1280+n*2+l] * weight[r*36+k*6+l]; // Step 2: convolution
                }
            }
            out_layer[r*358*638+m*638+n]=(unsigned char)(255.999f/(1+expf(-y[r*358*638+m*638+n]/256))); // Step 3: sigmoid function
        }
    }
}
To compute each output element on the feature map, three major steps are performed:
- Load the bias.
- Perform convolution over a window.
- Apply the sigmoid function to the result.
Explanation of the Provided Codes
Two versions of codes are provided, as described at the top of this page. The two versions have similar code structures, except that the CUDA version contains two additional files: "gpu_functions.cu" and "gpu_functions.h". The code structures are explain below.
The Pure C Version
It consists of a few files (explained below). The most important file is "conv_layer4.c".
|-- Makefile            :    The script to compile the code
|-- conv_layer4.c       :    The CNN code for the CPU
|-- data                :    The directory of input and pre-trained data
|   |-- bias01.bin      :    Bias of layer 1
|   |-- bias02.bin      :    Bias of layer 2
|   |-- bias03.bin      :    Bias of layer 3
|   |-- bias04.bin      :    Bias of layer 4
|   |-- test000046.pgm  :    Input image (1280x720) in PGM format
|   |-- weight01.bin    :    Weight of layer 1
|   |-- weight02.bin    :    Weight of layer 2
|   |-- weight03.bin    :    Weight of layer 3
|   `-- weight04.bin    :    Weight of layer 4
|-- utils.c             :    The source code of input/output functions
`-- utils.h             :    The header of input/output functions
To compile the code under Linux, simply type "make run", and then run the executable "cnn" (see the commands below).
unzip cnn_c.zip
cd cnn_c
make run
If the program runs correctly, it will print out to the screen the detected speed signs and their positions (see below). Some speed signs are detected multiple times, because the convolution window detects the same speed sign as it slides around the image.
  Elapsed time is 5.830000 s
number of detections = 8
detection nr 0 = 30 km/h, box pos= x 1072, y 304, confidence = 71
detection nr 1 = 30 km/h, box pos= x 1068, y 308, confidence = 96
detection nr 2 = 30 km/h, box pos= x 1072, y 308, confidence = 98
detection nr 3 = 50 km/h, box pos= x 312, y 420, confidence = 97
detection nr 4 = 50 km/h, box pos= x 316, y 420, confidence = 74
detection nr 5 = 50 km/h, box pos= x 312, y 424, confidence = 98
detection nr 6 = 50 km/h, box pos= x 316, y 424, confidence = 88
detection nr 7 = 50 km/h, box pos= x 704, y 432, confidence = 57
The detected speed signs are annotated in an output image called "output.pgm". On the server, you can use the "eog" image viewer to check the output (see the command below), assuming that you have enabled the X tunneling via ssh. If it is too slow to use the image viewer from the server, you can copy the image to your computer and view it locally with some free tools, e.g., GIMP.
eog ./output.pgm
The CUDA Version
The CUDA version still consists of the CPU code "conv_layer4.c", but has two additional files: "cuda_functions.cu" and "cuda_functions.h".
|-- Makefile            :    The script to compile the code
|-- conv_layer4.c       :    The CNN code for the CPU
|-- cuda_functions.cu   :    The source code of CUDA functions
|-- cuda_functions.h    :    The header file of CUDA functions
|-- data                :    The directory of input and pre-trained data
|   |-- bias01.bin      :    Bias of layer 1
|   |-- bias02.bin      :    Bias of layer 2
|   |-- bias03.bin      :    Bias of layer 3
|   |-- bias04.bin      :    Bias of layer 4
|   |-- test000046.pgm  :    Input image (1280x720) in PGM format
|   |-- weight01.bin    :    Weight of layer 1
|   |-- weight02.bin    :    Weight of layer 2
|   |-- weight03.bin    :    Weight of layer 3
|   `-- weight04.bin    :    Weight of layer 4
|-- findcudalib.mk      :    Addition script to compile CUDA program
|-- utils.c             :    The source code of input/output functions
`-- utils.h             :    The header of input/output functions
If you have already set up the tools on the server, then you can simply unzip the package to the folder "~/cuda-5.5/samples/0_simple" and type "make run" to compile and run the code (see the commands below).
cd ~/cuda-5.5/samples/0_Simple
unzip cnn_cuda5.5.zip
cd cnn_cuda5.5
make run
If the program runs correctly, it will print out to the screen the detected speed signs and their positions (see below). Some speed signs are detected multiple times, because the convolution window detects the same speed sign as it slides around the image. The GPU code is also timed and checked, but only with the first convolution layer.
CPU Elapsed time is 5.820000 s
number of detections = 8
detection nr 0 = 30 km/h, box pos= x 1072, y 304, confidence = 71
detection nr 1 = 30 km/h, box pos= x 1068, y 308, confidence = 96
detection nr 2 = 30 km/h, box pos= x 1072, y 308, confidence = 98
detection nr 3 = 50 km/h, box pos= x 312, y 420, confidence = 97
detection nr 4 = 50 km/h, box pos= x 316, y 420, confidence = 74
detection nr 5 = 50 km/h, box pos= x 312, y 424, confidence = 98
detection nr 6 = 50 km/h, box pos= x 316, y 424, confidence = 88
detection nr 7 = 50 km/h, box pos= x 704, y 432, confidence = 57

 ######## GPU running... ########
cudaMalloc success.
Bias read back: passed.
Weight read back: passed.
In_layer read back: passed.
GPU Elapsed time is 0.060000 s
Checking GPU results of layer 1 ...
GPU layer 1 passed.
The detected speed signs are annotated in an output image called "output.pgm". On the server, you can use the "eog" image viewer to check the output (see the command below), assuming that you have enabled the X tunneling via ssh. If it is too slow to use the image viewer from the server, you can copy the image to your computer and view it locally with some free tools, e.g., GIMP.
eog ./output.pgm
The GPU Implementation of the First Convolution Layer
The file "cuda_functions.cu" consists of the CUDA codes for the first convolution layer. The provided code has some examples of loading different data types and storing they into shared memory to improve locality.
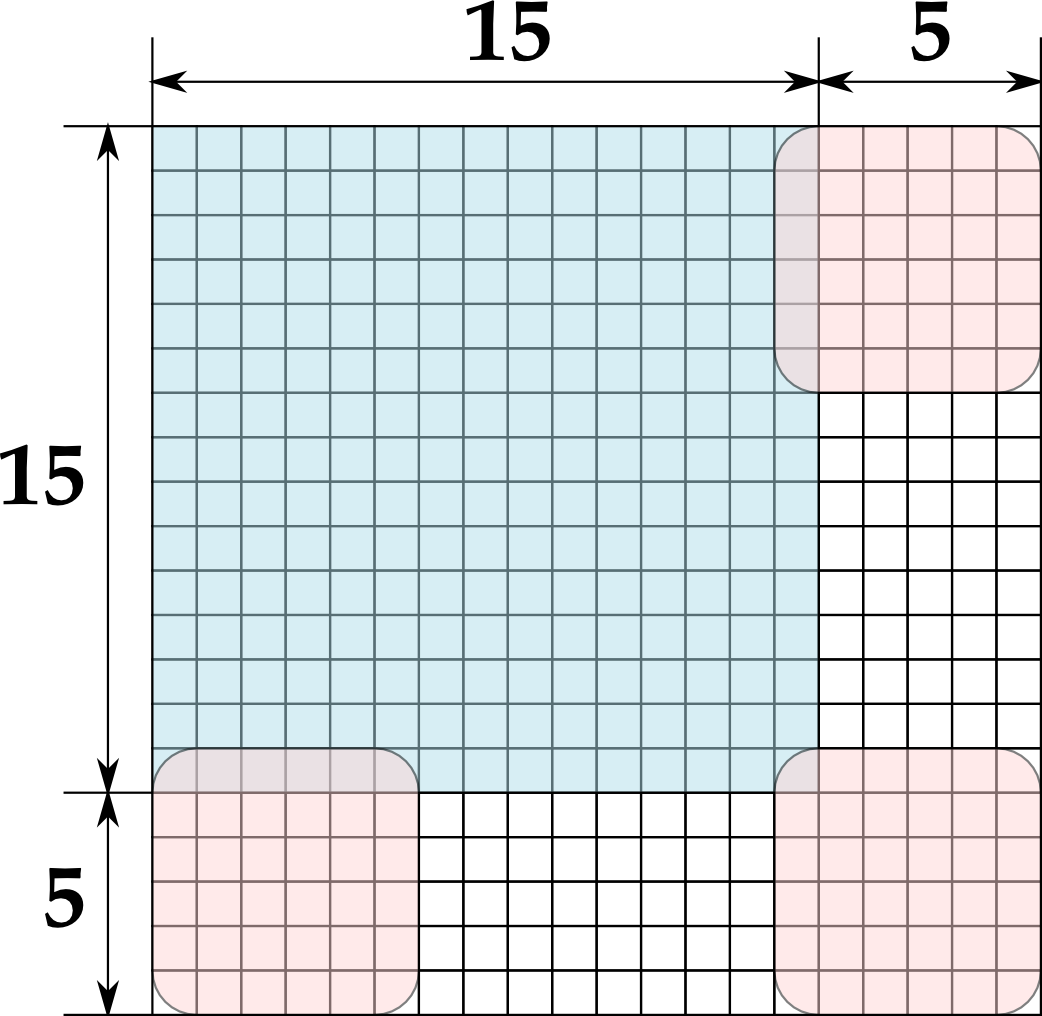
Assume a thread block of 8x8 threads computes an 8x8 tile of the output feature map. Due to the stride-2 access (a factor of two subsampling) of the input image, the 8x8 threads will touch 64 elements across a (8x2-1)x(8x2-1) tile. Moreover, due to the extra margin required for the 6x6 convolution window, the 8x8 threads will have a memory footprint of (8x2-1+6-1)x(8x2-1+6-1) on the input image, as illustrated below. Therefore, a 20x20 tile of input image needs to be loaded to the shared memory.
Adding Your Own CUDA Codes
So far, only layer 1 is implemented on the GPU, which is yet to be further optimized by you. In this assignment, you will map the the remaining parts of the CNN to the GPU. You can add your CUDA functions to the "cuda_functions.cu" source file and declare your function in the "cuda_functions.h" header file. If you are familiar with the make, you can also modify the "Makefile" to customize the compilation and source files.
Besides timing, please also check the correctness of your GPU code. You can compare the results, either intermediate results or end results, between the CPU and GPU functions, as shown in the Layer 1 implementation. At the beginning, you may encounter errors while compiling or running your own CUDA program. To troubleshoot these errors, you can check out the official CUDA documents, especially the "CUDA C Programming Guide" and the "CUDA C Best Practices Guide".
Using CUDA Profiler API (Optional)
This section is optional. It is the last resort for those who really need to profile their code but encounter crashes with the visual profiler and the command line profiler.
Some users of the server encounter occasionally crashes when using either the visual profiler (nvvp) or the command line profiler (nvprof). While there is not yet a good solution to solve this problem, an alternative is to use the CUDA profiler API in your code. The profiler API can shorten the overall run time of the profiling process, which may reduce the chance of crash. An example is given in "cnn_cuda5.5_profiler_api.zip", which shows the usage of "cudaProfilerInitialize", "cudaProfilerStart", and "cudaProfilerStop". You can run the commands below to compile and run it.
cd ~/cuda-5.5/samples/0_Simple
wget https://sites.google.com/site/5kk73gpu2013/assignment/cnn/cnn_cuda5.5_profiler_api.zip -O cnn_cuda5.5_profiler_api.zip
unzip cnn_cuda5.5_profiler_api.zip
cd cnn_cuda5.5_profiler_api
make run
If no error occurs, you will see the profile output "profiler_output0.csv". If you have multiple contexts, you will have more than one output files, e.g., "profiler_output1.csv". You can ransfer the csv file to your computer and open it locally with your office software or other csv viewers.
You can insert these profiler APIs to your existing code by changing a few lines of your code.
1. Copy the profiler configuration file "profiler_config.txt" from the "cnn_cuda5.5_profiler_api.zip" to your cnn_cuda5.5 folder.
2. Include the API header and the functions to the "cuda_functions.cu" file.
#include
// copy three functions from cuda_functions.cu in the cnn_cuda5.5_profiler_api.zip
void cuda_profiler_init(){ ... }
void cuda_profiler_start(){ ... }
void cuda_profiler_stop(){ ... }
3. Definition these functions in the "cuda_functions.h" file.
void cuda_profiler_init();
void cuda_profiler_start();
void cuda_profiler_stop();
4. Call the functions from the "conv_layer4.c" file.
cuda_profiler_init();
cuda_profiler_start();
cuda_profiler_stop();
After these steps, the CUDA profiler will be invoked from within the cnn program, which does not allow using the the external profilers (nvvp and nvprof) any more. If you want to fall back to using external profilers, comment out the three API function calls in the "conv_layer4.c".